Thursday, April 12, 2018

Initial configuration

The introduction of Next Generation Firewalls has changed the dimension of management and configuration of firewalls, most of the well-known Firewall vendors have done a major revamp, be it the traditional command line mode or the GUI mode.
Palo Alto Networks is no different to many of those vendors, yet it is unique in terms of its WebUI. It’s a whole new experience when you access the WebUI of Palo Alto Networks Next-Generation Firewalls.
In order to start with an implementation of the Palo Alto Networks Next-Generation Firewalls one needs to configure them. Palo Alto Networks Next-Generation Firewalls can be accessed by either an out-of-band management port labelled as MGT or a Serial Console port (similar to Cisco devices). By using the MGT port, one can separate the management functions of the firewall from the data processing functions. All initial configurations must be performed either on out-of-band management interface or by using a serial console port. The serial port has default values of 9600-N-1 and a standard roll over cable can be used to connect to a serial port.
 Palo Alto Networks Firewall PA-5020 Management & Console Port 
Figure 1.   Palo Alto Networks Firewall PA-5020 Management & Console Port
By default, Palo Alto Networks Next-Generation Firewalls use MGT port to retrieve license information and update the threats and application signature, therefore it is imperative the MGT port has proper DNS settings configured and is able to access the internet.
To access the Palo Alto Networks Firewall for the first time through the MGT port, we need to connect a laptop to the MGT port using a straight-thru Ethernet cable. By default, the web gui interface is accessed through the following IP Address and login credentials (note they are in lower case):
  • MGT Port IP Address: 192.168.1.1 /24
  • Username: admin
  • Password: admin
For security reasons it’s always recommended to change the default admin credentials. Until this condition is satisfied, the Palo Alto Networks Firewall alerts the administrator to change the default password every time he logs in, as shown in the screenshot below:
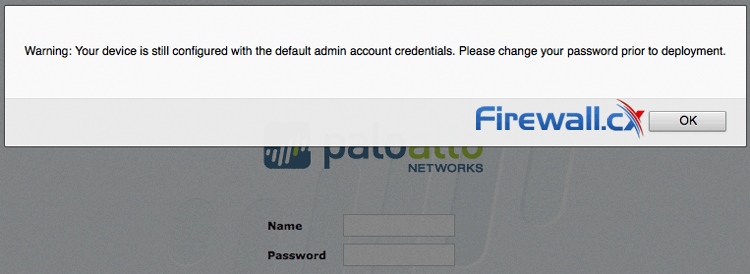
 Palo Alto Networks Firewall alerts the administrator to change the default password
Figure 2. Palo Alto Networks Firewall alerts the administrator to change the default password

PERFORMING THE INITIAL SETUP IN PALO ALTO NETWORKS FIREWALL CHECK LIST

Below is a list of the most important initial setup tasks that should be performed on a Palo Alto Networks Firewall regardless of the model:
  • Change the default login credentials
  • Configure the management IP Address & managed services (https, ssh, icmp etc)
  • Configure DNS & NTP Settings
  • Register and Activate the Palo Alto Networks Firewall
Let’s take a look at each step in greater detail.

CHANGE THE DEFAULT LOGIN CREDENTIALS

Step 1: Establish connectivity with the Palo Alto Networks Firewall by connecting an Ethernet cable between the Management and the laptop’s Ethernet interface.
Step 2: Configure the laptop Ethernet interface with an IP address within the 192.168.1.0/24 network. Keep in mind that we’ll find the Palo Alto Networks Firewall at 192.168.1.1 so this IP must not be used.
Step 3: Open a web browser and navigate to the URL https://192.168.1.1 – Take note that this is an HTTPS site. At this point the Palo Alto Networks Firewall login page appears.
Step 4: Enter admin for both name and password fields.
Step 5: From the main menu, click Device > Administrators > admin
  • Type the old password in the Old Password field
  • Type the new password in the New Password field
  • Type new password in the Confirm New Password field
  • Click ok

CONFIGURE THE MANAGEMENT IP ADDRESS & MANAGEMENT SERVICES (HTTPS, SSH, ICMP)

At this point we have connectivity to the Palo Alto Networks Firewall and need to change the management IP address:
Step 1: Logon to the Palo Alto Networks Firewall using the new credentials entered in the previous section.
Step 2: From the web interface click Device > Setup > Management and select the Management Interface Settings radio button as shown below:
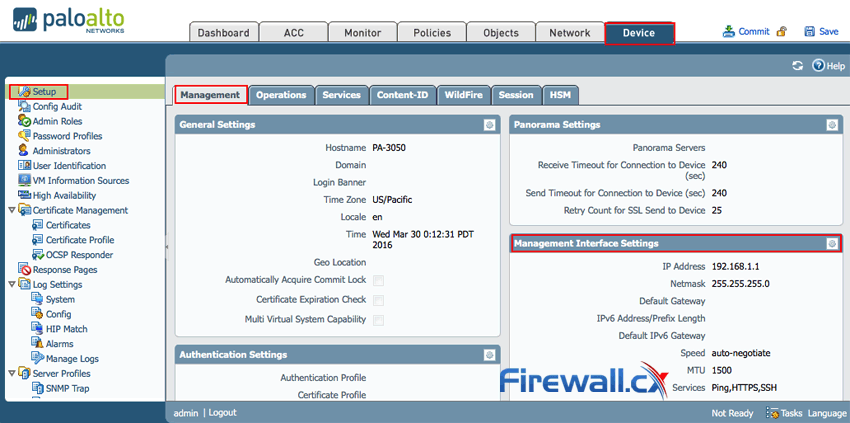
Accessing the Palo Alto Networks Firewall Management IP Address tab
Figure 3. Accessing the Palo Alto Netowkrs Firewall Management IP Address tab
Next, change the IP Address accordingly and enable or disable any management services as required. HTTPSSSH and Ping (ICMP) are enabled by default. When ready click ok:
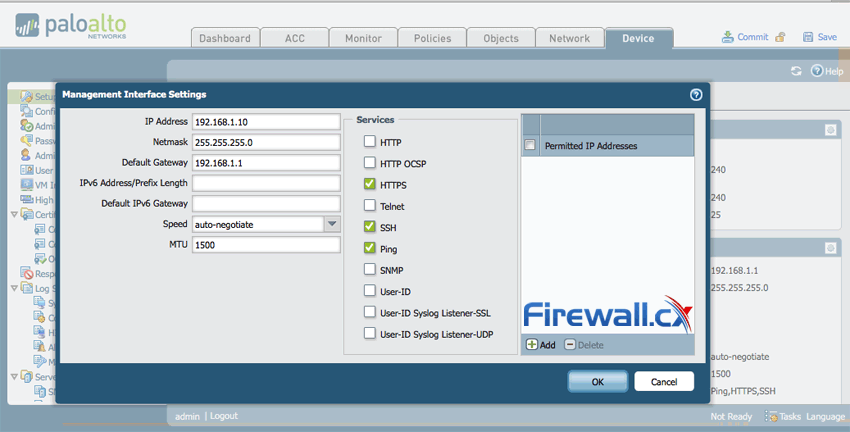
Changing the Management IP Address & services on the Palo Alto Networks Firewall
Figure 4. Changing the Management IP Address & services on the Palo Alto Networks Firewall
Step 3: Now click on Commit on the top right corner to save and commit the changes to the new configuration

CONFIGURE DNS & NTP SETTINGS IN PALO ALTO NETWORKS

This section assumes all previous steps have been completed and we are currently logged into the Palo Alto Networks Firewall web interface.
Step 1: From the menu, click Device > Setup > Services and configure the DNS Servers as required. When ready, click on OK:
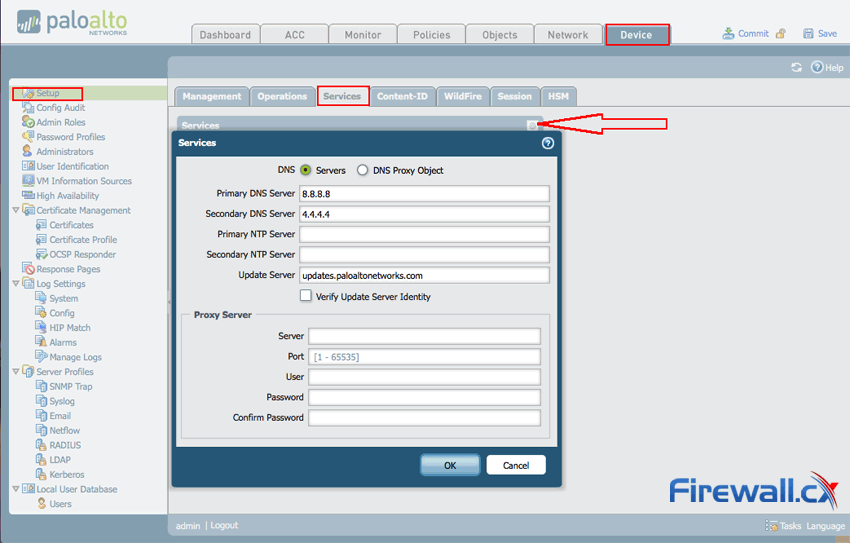
Configuring DNS Settings on Palo Alto Networks firewall
Figure 5. Configuring DNS Settings on Palo Alto Networks firewall
Step 2Click on the Commit button on the top right corner to commit the new changes.

CONFIGURE MANAGEMENT IP ADDRESS, DEFAULT GATEWAY, DNS & NTP SETTINGS CLI (PAN-OS)

Similar to Cisco devices, Palo Alto Networks devices can be configured by web or CLI interface. While CLI interface tends to be slightly more challenging it does provides complete control of configuration options and extensive debugging capabilities.
This section shows how to configure your Palo Alto Networks firewall using the console port. The computer’s serial port must have the following settings to correctly connect and display data via the console port:
Step 1: Login to the device using the default credentials (admin / admin).
Step 2: Enter configuration mode by typing configure:
admin@PA-3050> configure
Step 3: Configure the IP address, subnet mask, default gateway and DNS Severs by using following PAN-OS CLI command in one line:
admin@PA-3050# set deviceconfig system ip-address 192.168.1.10 netmask 255.255.255.0 default-gateway 192.168.1.1 dns-setting servers primary 8.8.8.8 secondary 4.4.4.4
Step 4: Commit changes
admin@PA-3050# commit

REGISTERING AND ACTIVATING PALO ALTO NETWORKS FIREWALL

This section assumes all previous steps have been completed and we are currently logged into the Palo Alto Networks Firewall web interface.
Step 1Click Dashboard and look for the serial information in the General Information Widget,
If the widget is not added, click on Widgets > Systems > General Information:
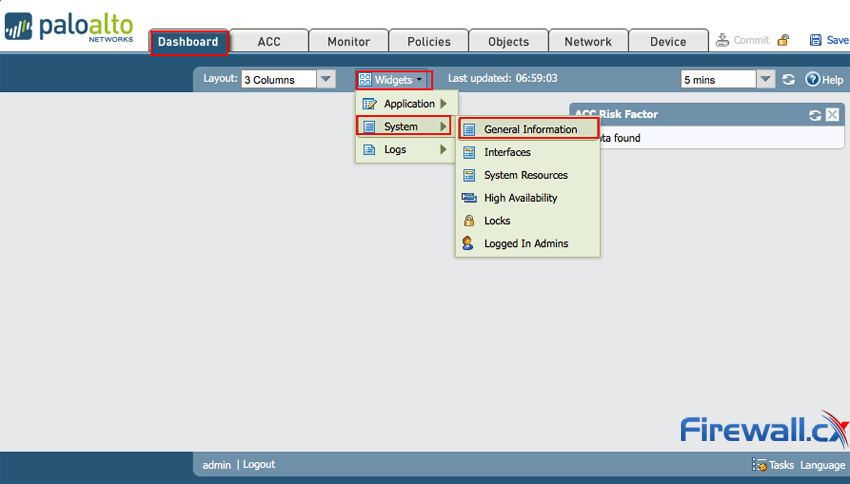
Adding Widgets to the Palo Alto Networks Firewall Web Interface
Figure 6. Adding Widgets to the Palo Alto Networks Firewall Web Interface
Step 2: Create a support account with Palo Alto Support.
Registering your Palo Alto Networks device is essential so you can receive product updates, firmware upgrades, support and much more.
First we need to create an account at https://support.paloaltonetworks.com and then proceed with the registration of our Palo Alto Networks Firewall device, during which we’ll need to provide the sales order number or customer ID, serial number of the device or authorization code provided by our Palo Alto Networks Authorized partner.
Further details about registration and activation process are available at Palo Alto Networks Live portal .
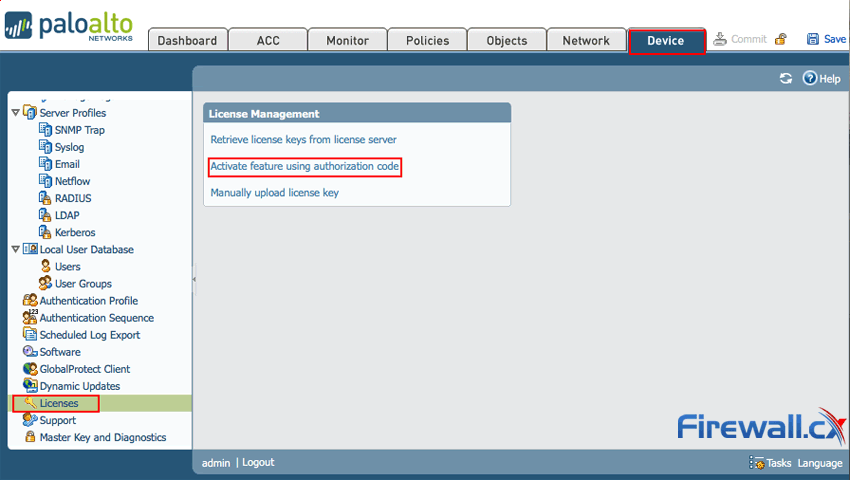
Step 3: Activate the license by clicking Device > License and select Activate feature using authorization code:
Activating the Palo Alto Networks Firewall license
Figure 7. Activating the Palo Alto Networks Firewall license
When prompted, enter the Authorization Code and then click OK.
Finally, verify that the license was successfully activated.
Once the Palo Alto Networks Firewall is activated, it is ready for configuration according to our business’s needs.
This article showed how to configure your Palo Alto Networks Firewall via Web interface and Command Line Interface (CLI). We covered configuration of Management interfaceenable/disable management services (https, ssh etc), configure DNS and NTP settingsregister and activate the Palo Alto Networks Firewall.
Benefits of PAN firewalls

What makes Palo Alto Networks Next-Generation Firewall (NGFW) so different from its competitors is its PlatformProcess and Architecture. Palo Alto Networks delivers all the next generation firewall features using the single platformparallel processing and single management systems, unlike other vendors who use different modules or multiple management systems to offer NGFW features.
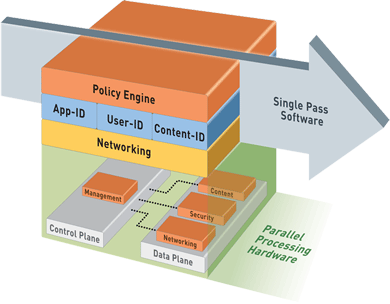
Palo Alto Networks Next-Generation Firewall’s main strength is its Single Pass Parallel Processing (SP3Architecture, which comprises two key components:
  1. Single Pass Software
  2. Parallel Processing Hardware
palo-alto-firewall-single-pass-parallel-processing-hardware-architecture-1
Figure 1.   Palo Alto Networks Firewall Single Pass Parallel Processing Architecture

SINGLE PASS SOFTWARE

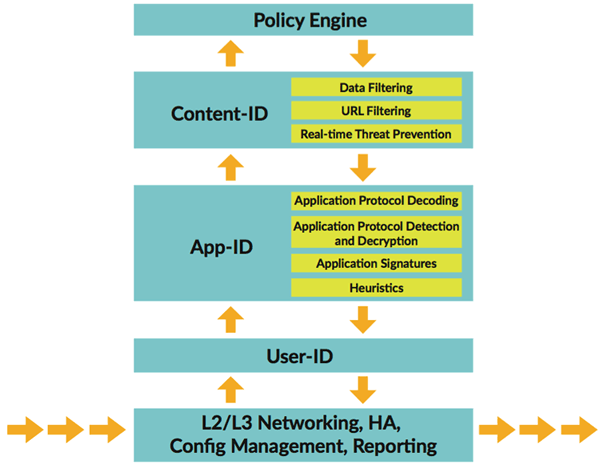
Palo Alto Networks Next-Generation Firewall is empowered with Single Pass Software, which processes the packet to perform functions like networking, user identification (User-ID), policy lookup, traffic classification with application identification (App-ID), decoding, signature matching for identifying threats and contents, which are all performed once per packet as shown in the illustration below:
palo-alto-firewall-single-pass-parallel-processing-hardware-architecture-2
Figure 2: Palo Alto Networks Firewall - Single-Pass Architecture Traffic Flow
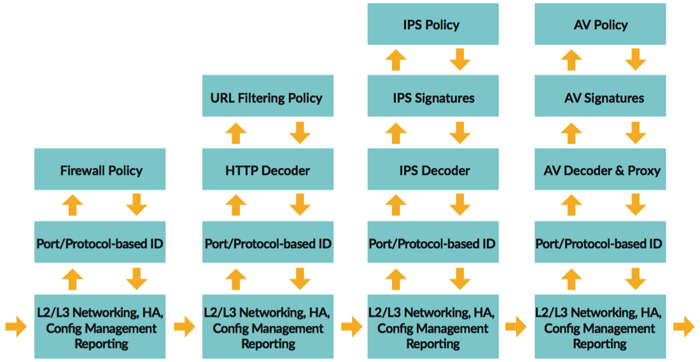
This processing of a packet in one go or single pass by Palo Alto Networks Next-Generation Firewall enormously reduces the processing overhead, other vendor firewalls using a different type of architecture produce a significantly higher overhead when processing packets traversing the firewall. It’s been observed that the Unified Threat Management (UTM), which processes the traffic using multi-pass architecture, results in process overhead, latency introduction and throughput degradation.
The diagram below illustrates the multi-pass architecture process used by other vendors’ firewalls, clearly showing differences to the Palo Alto Networks Firewall architecture and how the processing overhead is produced:
palo-alto-firewall-single-pass-parallel-processing-hardware-architecture-3
Figure 3: Traffic Flow for multi-pass architecture resulting in additional overhead processing
Palo Alto Networks Next-Generation Firewall Single Pass Software scans the contents based on the same stream and it uses uniform signature matching patterns to detect and block threats. By adopting this methodology Palo Alto Networks Next-Generation Firewall is negating the use of separate scan engines and signature sets, which results in low latency and high throughput.

PARALLEL PROCESSING HARDWARE

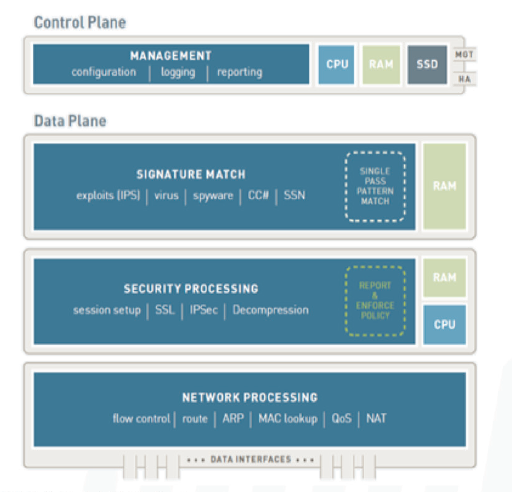
Palo Alto Networks Parallel Processing hardware ensures function-specific processing is done in parallel at the hardware level which, in combination with the dedicated Data plane and Control plane, produces stunning performance results. By separating the Data plane and Control plane, Palo Alto Networks is ensuring heavy utilization of either plane will not impact the overall performance of the Platform. At the same time, this means there is no dependency on either plane as each has its own CPU and RAM as illustrated in the diagram below:
palo-alto-firewall-single-pass-parallel-processing-hardware-architecture-4
Figure 4: Palo Alto Networks Firewall Hardware Architecture – Separation of Data Plane and Control Plane
The Control Plane is responsible for tasks such as management, configuration of Palo Alto Networks Next-Generation Firewall and it takes care of logging and reporting functions.
Palo Alto Networks Next-Generation Firewall offers processors dedicated to specific functions that work in parallel. The Data Plane in the high-end models contains three types of processors (CPUs) connected by high-speed 1Gbps busses.
The three type of processors are:
  1. Security Matching Processor: Dedicated processor that performs vulnerability and virus detection.
  2. Security Processor: Dedicated processor that performs hardware acceleration and handles security tasks such as SSL decryption, IPsec decryption and similar tasks.
  3. Network Processor: Dedicated processor responsible for network functions such as routing, NAT, QOS, route lookup, MAC Lookup and network layer communications.

CONCLUSION

Palo Alto Networks unique architecture and design has played a significant role in helping place it apart from the rest of its competitors. Its Single Platform Parallel Processing architecture coupled with the single management system results in a fast and highly sophisticated Next-Generation Firewall that won’t be left behind anytime soon.

APP-ID, USER-ID, and ACC

Our previous article examined the benefits of Palo Alto Networks Firewall Single Pass Parallel Processing (SP3) architecture and how its combine with the separate Data and Control planes to boost firewall performance and handle large amounts of traffic without and performance impact. This article focuses on the traffic flow logic inside the Palo Alto Firewall and two unique features that separate it from the competition: Application-based policy enforcement (App-ID) & User Identification (User-ID).
For more Technical articles on Palo Alto Networks Firewalls, visit our Palo Alto Networks Firewall Section

FLOW LOGIC OF THE NEXT-GENERATION FIREWALL

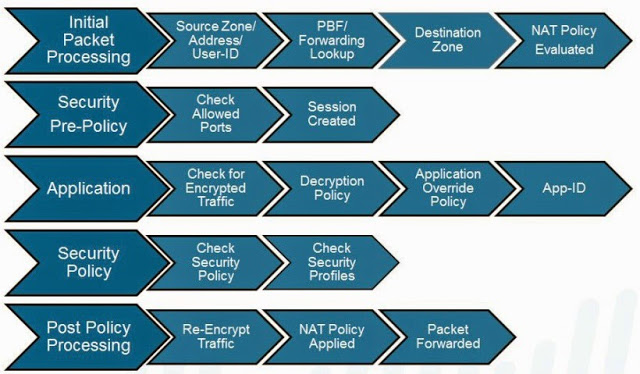
The diagram below is a simplified version of the flow logic of a packet travelling through a Palo Alto Networks Next-Generation Firewalland this can be always used a reference to study the packet processing sequence:
palo-alto-firewall-app-id-user-id-application-control-centre-1
Figure 1. Flow Logic of a packet inside the Palo Alto Networks Next Generation Firewall
Palo Alto Networks Next-Generation Firewalls works with the concepts of zones not interfaces, once a packet enters the firewall, the Palo Alto Networks Next-Generation Firewalls identifies from which zone the packet came and where it is destined to go. This is similar to Cisco IOS Routers Zone-based Firewalls and Cisco ASA Firewalls.
Users interested can also download for free the Palo Alto Networks document “Day in the Life of a Packet” found in our Palo Alto Networks Download section which explains in great detail the packet flow sequence inside the Palo Alto Networks Firewall.
APP-ID & USER-ID – FEATURES THAT SET PALO ALTO APART FROM THE COMPETITION

App-ID and User-ID are two really interesting features not found on most competitors’ firewalls and really help set Palo Alto Networks apart from the competition. Let’s take a look at what App-ID and User-ID are and how they help protect the enterprise network.

APP-ID: APPLICATION-BASED POLICY ENFORCEMENT

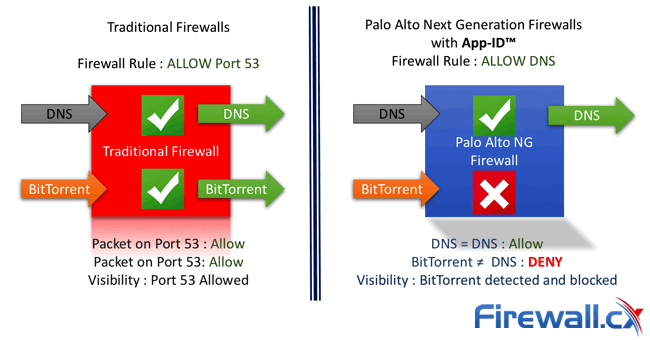
App-ID is the biggest asset of Palo Alto Networks Next-Generation Firewalls. Traditional firewalls block traffic based on protocol and/or ports, which years ago seemed to be the best way of securing the network perimeter, however this approach today is inadequate as applications (including SSL VPNs) can easily bypass a port-based firewall by hopping between ports or using well-known open ports such as tcp-http (80) or tcp/udp-dns (53) normally found open.
A traditional firewall that allows the usage of TCP/UDP port 53 for DNS lookups, will allow any application using that port to pass through without asking second questions. This means that any application can use port 53 to send/receive traffic, including evasive applications like BitTorrent for P2P file sharing, which is quite dangerous:
Palo Alto Network’s App-ID effectively blocks unwanted BitTorrent traffic
Figure 2. Palo Alto Network’s App-ID effectively blocks unwanted BitTorrent traffic
With App-ID, Palo Alto Networks Next-Generation Firewalls uses multiple identification mechanisms to determine the exact identity of applications traversing the network. Following is the order in which traffic is examined and classified:
  1. Traffic is classified based on the IP Address and port
  2. Signatures are then applied to the allowed traffic to identify the application based on unique application properties and related transaction characteristics.
  3. For evasive applications which cannot be identified though advance signature and protocol analysis Palo Alto Networks Next-Generation Firewalls applies heuristics or behavioral analysis to determine the identity of the application.
Using the above process Palo Alto Networks Next-Generation Firewalls are very successful in identifying DNS traffic not only at the port level but also at the Application level, making it extremely difficult for an evasive application like BitTorrent to use any open ports and pass through the firewall undetected.

USER IDENTIFICATION (USER-ID)

User-ID is one more key determining factor that places Palo Alto Networks Next-Generation Firewalls apart from the competition.
Traditionally, security policies and rules were applied based on IP addresses. However, these days both the users and applications have a dynamic nature which means that IP addresses alone have become inefficient for monitoring and controlling user activity. A single user might access the network from multiple devices (laptops, tablets, smartphones, servers).
Thanks to the User-ID feature of the Palo Alto Networks Next-Generation Firewalls administrators are able to configure and enforce firewall policies based on users and user groups instead of network zones and addresses.
The Palo Alto Networks Next-Generation Firewall can communicate with many directory servers, such as Microsoft Active Directory, eDirectory, SunOne, OpenLDAP, and most other LDAP-based directory servers to provide user and group information to the firewall. With this powerful feature, large organizations are able to create security policies that are user or group based, without worrying about IP addresses associated to them.

THREAT PREVENTION

Palo Alto Networks Next-Generation Firewalls are very effective in preventing threats and they do offer real-time threat prevention from viruses, worms, spyware, and other malicious traffic can be varied by application and traffic source.

APPLICATION COMMAND CONTROL (ACC)

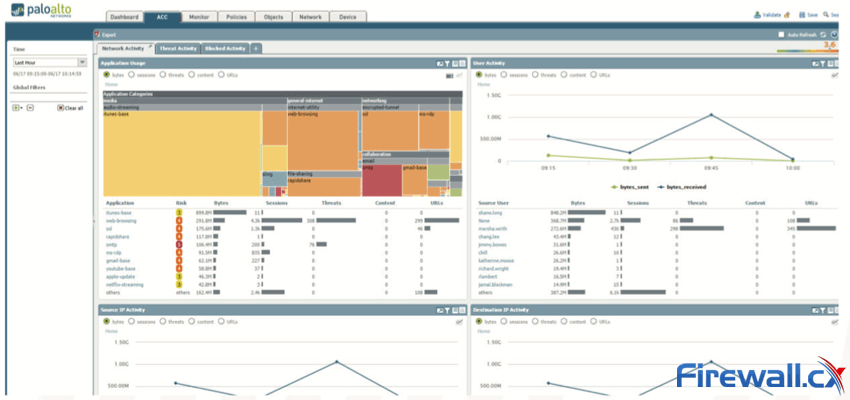
Palo Alto Networks Next-Generation Firewalls offer the most interactive graphical summary of the applications, URLs, users, threats, and content traversing the network. The ACC makes use of the firewall logs to provide the visibility of the traffic patterns, information on threats, user activity, Rule usage and many other information in an interactive graphical form:
Palo Alto Application Command Center provides maximum visibility on network traffic (click to enlarge)
Figure 3. Palo Alto Application Command Center provides maximum visibility on network traffic (click to enlarge)

CONCLUSION

This article why Palo Alto Networks Next-Generation Firewalls are really unique in many terms. Features such as App-ID and User-IDallow in-depth control of applications and users, making it possible to fully manage small to very large enterprises without a problem. The Application Command Control (ACC) helps give the administrator a complete view of applications and services accessing the internetalongside with some very useful statistics.

Security zones and Interfaces

Palo Alto Networks Next-Generation Firewalls rely on the concept of security zones in order to apply security policies. This means that access lists (firewall rules) are applied to zones and not interfaces – this is similar to Cisco’s Zone-Based Firewall supported by IOS routers.
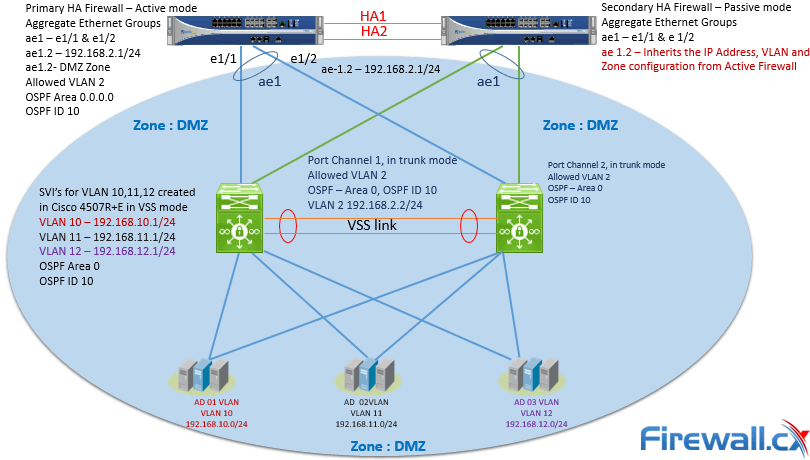
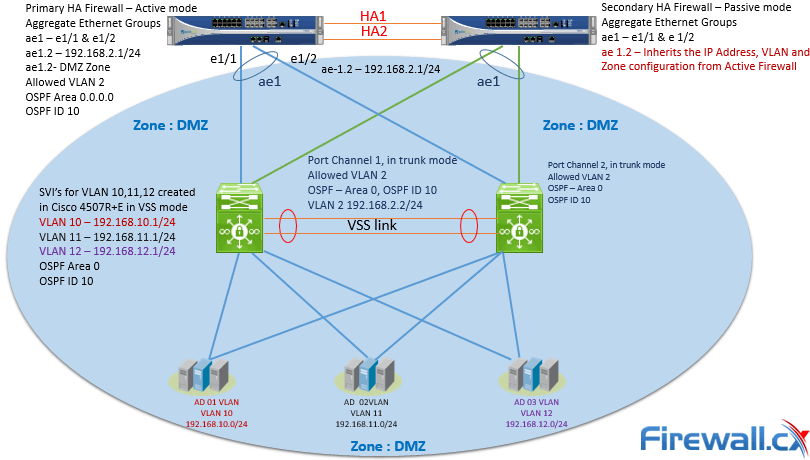
Palo Alto Networks Next-Generation Firewalls zones have no dependency on their physical location and they may reside in any location within the enterprise network. This is also illustrated in the network security diagram below:
Palo Alto Firewall Security Zones can contain networks in different locations Figure 1. Palo Alto Firewall Security Zones can contain networks in different locations
The above topology illustrated shows VLANs 1011 ,12 and 2 managed by a Cisco Catalyst 4507R+E Switch and are all part of OSPF Area 0 and visible as routes in the Palo Alto Firewall. A Layer 3 aggregated link has been created between the Palo Alto Firewall (Interface ae1 on each firewall) and the Cisco 4507R+E Switch (Port-Channel 1 & 2).
When aggregation interface ae1.2 on the Palo Alto Firewall is configured to be part of the DMZ Security Zone, all networks learnt by the OSPF routing protocol on interface ae1.2 will be part of the DMZ Security Zone.
Creating a Security Zone involves tasks such as naming the zone, assigning the interfaces to the new zone created and more. Palo Alto Networks Next-Generation Firewalls won’t process traffic from any interface unless they are part of a Security Zone.
The diagram below depicts the order in which packets are processed by the Palo Alto Firewall:
Initial Packet Processing – Flow Logic of Palo Alto Next-Generation FirewallFigure 2. Initial Packet Processing – Flow Logic of Palo Alto Next-Generation Firewall
It is without doubt Zone based firewalls provide greater flexibility in security design and are also considered easier to administer and maintain especially in large scale network deployments.
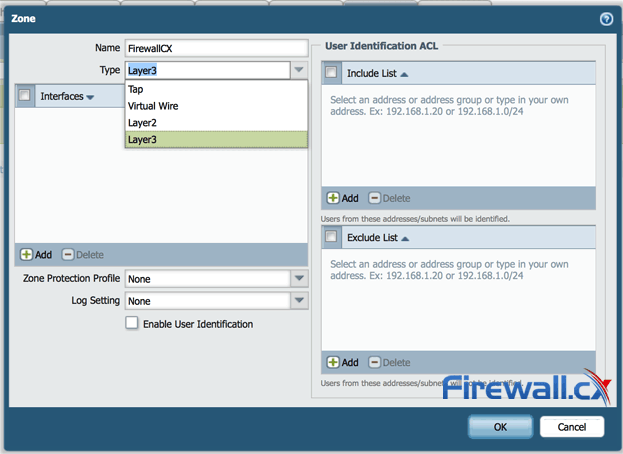
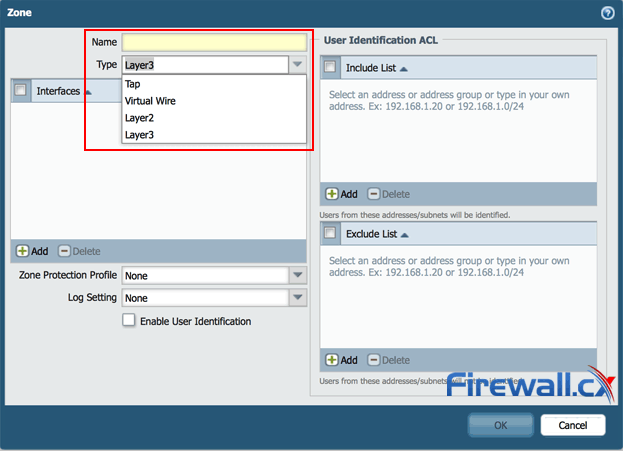
Palo Alto Networks Next-Generation Firewalls have four main types of Zones namely as shown in the screenshot below:
  • Tap Zone. Used in conjunction with SPAN/RSPAN to monitor traffic.
  • Virtual Wire. Also known as Transparent Firewall.
  • Layer 2. Used when switching between two or more networks.
  • Layer 3. Used when routing between two or more networks. Interfaces must be assigned an IP address.
Types of Security Zones in Palo Alto Firewalls 
Figure 3. Types of Security Zones in Palo Alto Firewalls
Palo Alto Networks Next-Generation Firewalls have special zone called External which is used to pass traffic between Virtual Systems (vsys) configured on the same firewall appliance. The External zone type is only available in the Palo Alto Networks Next-Generation Firewalls which are capable of Virtual Systems and also the External Zone is visible only when the multi-vsys feature is enabled.

CREATING A SECURITY ZONE

This section focuses on creating different types of Security zones in Palo Alto Networks Next-Generation Firewalls
Step 1. Login to the WebUI of Palo Alto Networks Next-Generation Firewall
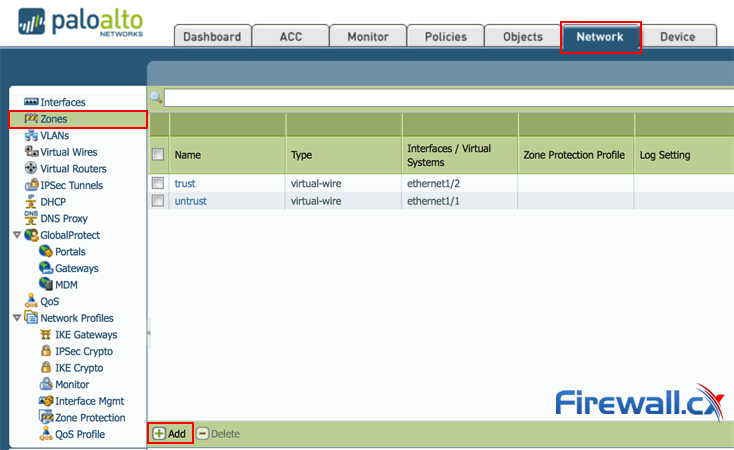
Step 2. From the menu, click Network > Zones > Add
Creating a new Zone in a Palo Alto Firewall
Figure 4. Creating a new Zone in Palo Alto Firewall
Step 3. Provide the name for the new Zone, and select the zone type and click OK:
Creating a zone in a Palo Alto Firewall
Figure 5. Creating a zone in a Palo Alto Firewall
In a similar manner we can repeat steps 1 to 3 to create TapVirtual Wire or Layer 2 security zones.
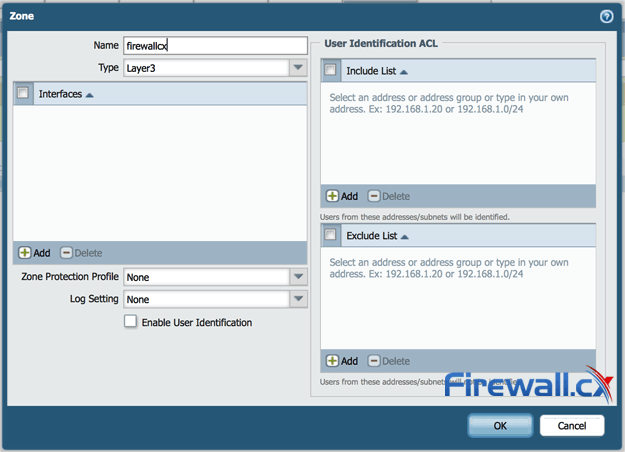
Finally it is important to note that the zone names is case sensitive, so one needs to be careful as the zone FiewallCX and firewallcx are considered different zones:
Identically named Security zones using different letter cases result in different Security zones
Figure 6. Identically named Security zones using different letter cases result in different Security zones
 Example of case sensitive security zones with identical zone names
Figure 7. Example of case sensitive security zones with identical zone names
Creating a security zone in Palo Alto Networks Next-Generation Firewalls involves three steps:
Step 1. Specify the Zone name
Step 2. Select the Zone type
Step 3. Assign the Interface
The interfaces part will be dealt in upcoming posts as one need to understand types of interfaces Palo Alto Networks Next-Generation Firewalls offers and how they work.
In Palo Alto Networks Next-Generation Firewalls zone names have no predefined meaning or policy associations, basically they are created to group the services by functions for examples one can group all the Domain Controllers in one security group no matter even if they are part of different networks.
 Example of grouping Domain Controllers in same security zone – DMZ
Figure 8. Example of grouping Domain Controllers in same security zone – DMZ
As mentioned Palo Alto Networks Next-Generation Firewalls works with the principle of Security zones, by default Intra-Zone traffic is allowed and Inter-Zone traffic is denied.

Firewall configuration options

Our previous article explained how Palo Alto Firewalls make use of Security Zones to process and enforce security policies. This article will explain the different configuration options for physical Ethernet and logical interfaces available on the Palo Alto Firewall.
It’s easy to mix and match the interface types and deployment options in real world deployments and this seems to be the strongest selling point of Palo Alto Networks Next-Generation Firewalls. Network segmentation becomes easier due to the flexibility offered by a single pair of Palo Alto appliances.
Below is a list of the configuration options available for Ethernet (physical) interfaces:
  • Tap Mode
  • Virtual Wire
  • Layer 2
  • Layer 3
  • Aggregate Interfaces
  • HA
Following are the Logical interface options available:
  • VLAN
  • Loopback
  • Tunnel
  • Decrypt Mirror
The various interface types offered by Palo Alto Networks Next-Generation Firewalls provide flexible deployment options.

TAP MODE DEPLOYMENT OPTION

TAP Mode deployment allows passive monitoring of the traffic flow across a network by using the SPAN feature (also known as mirroring).
A typical deployment would involve the configuration of SPAN on Cisco Catalyst switches where the destination SPAN port is the switch port to which our Palo Alto Firewall connects, as shown in the diagram below:
 Palo Alto Next Generation Firewall deployed in TAP mode
Figure 1. Palo Alto Next Generation Firewall deployed in TAP mode
The advantage of this deployment model is that it allows organizations to closely monitor traffic to their servers or network without requiring any changes to the network infrastructure.
During the configuration of SPAN it is important to ensure the correct SPAN source and SPAN Destination ports are configured while also enabling Tap mode at the Firewall.
Tap mode offers visibility of application, user and content, however, we must be mindful that the firewall is unable to control the traffic as no security rules can be applied in this mode. Tap mode simply offers visibility in the ACC tab of the dashboard. The catch here is to ensure that the tap interface is assigned to a security zone.

VIRTUAL WIRE  (V-WIRE) DEPLOYMENT OPTION

Virtual Wire, also know as V-Wire, deployment options use Virtual Wire interfaces. The great thing about V-Wire deployment is that the firewall can be inserted into an existing topology without requiring any changes to the existing network topology.
The V-Wire deployment options overcome the limitations of TAP mode deployment, as engineers are able to monitor and control traffic traversing the link. A Virtual Wire interface supports App-IDUser-IDContent-IDNAT and decryption.
 Palo Alto Next Generation Firewall deployed in V-Wire mode
Figure 2. Palo Alto Next Generation Firewall deployed in V-Wire mode

LAYER 2 DEPLOYMENT OPTION

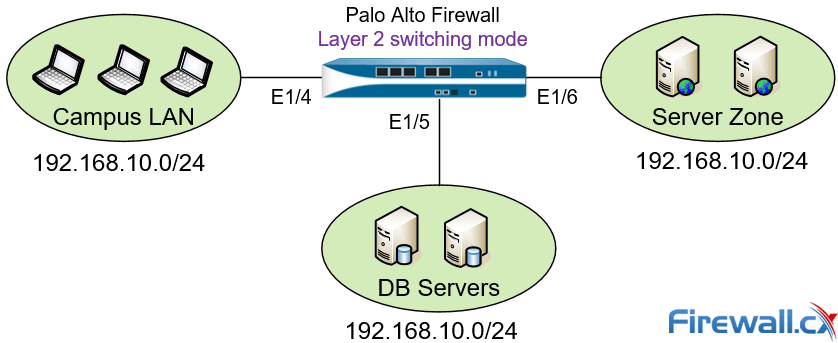
Palo Alto Networks Next Generation Firewall can also be deployed in Layer 2 mode. In this mode switching is performed between two or more network segments as shown in the diagram below:
 Palo Alto Next Generation Firewall deployed in Layer 2 mode
Figure 3. Palo Alto Next Generation Firewall deployed in Layer 2 mode
In Layer 2 deployment mode the firewall is configured to perform switching between two or more network segments. Traffic traversing the firewall is examined, as per policies, providing increased security and visibility within the internal network.
In this mode the firewall interfaces are capable of supporting Access or Trunk Links (802.1Q trunking) and do not participate in the Spanning Tree topology. Any BPDUs received on the firewall interfaces are directly forwarded to the neighboring Layer 2 switch without being processed. Routing traffic between VLAN networks or other networks can be achieved via a default Gateway which is usually a Layer 3 switch supporting InterVLAN routing, a Firewall security appliance, or even Router-on-a-Stick design.

LAYER 3 DEPLOYMENT OPTION

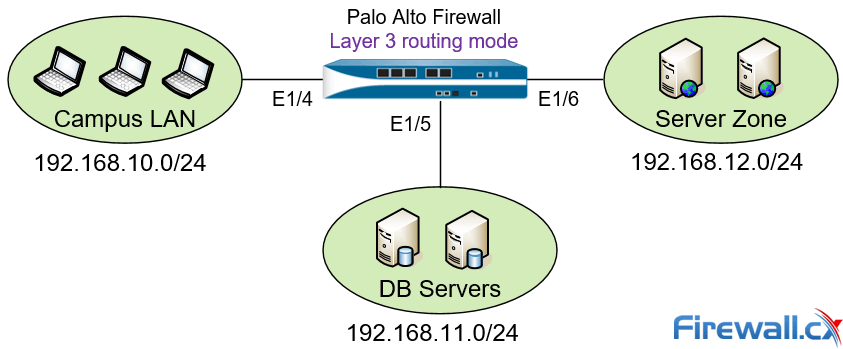
Layer 3 deployment mode is a popular deployment setup. In this mode the firewall routes traffic between multiple interfaces, each of which is configured with an IP address and security zone. The Firewall interfaces can also be configured to obtain their IP address via a DHCP server and can be used to manage the security appliance.
 Palo Alto Next Generation Firewall deployed in Layer 3 mode
Figure 4 – Palo Alto Next Generation Firewall deployed in Layer 3 mode
The diagram above shows a typical Layer 3 deployment setup where the Firewall routes and controls traffic between three different IP networks. Similar to other setup methods, all traffic traversing the Firewall is examined and allowed or blocked according to the security policies configured.

CONCLUSION

In this article we examined a few of the different deployment modes available for Palo Alto firewalls. We talked about Tap modeVirtual Wire modeLayer 2 and Layer 3 deployment modes. Each deployment method is used to satisfy different security requirements and allows flexible configuration options

Initial configuration

The introduction of Next Generation Firewalls has changed the dimension of management and configuration of firewalls, most of the well-know...